Before I can build my controller, I need to design it. I have spent some time sketching out potential designs for the layout. The controller will consist of an on/off switch, a screen (the colour of which will be selected based on how well it can be read in bright daylight), and a set of buttons/controls. Ideally, the controller should be as simple as possible. Traditional controllers tend to be quite large, so that they are easier to hold. I have attempted to consider controller ergonomics in my designs. The aerial drawn on these designs is for illustrative purposes, as I do not know what sort of aerial I will be using as of yet. The specific styles of buttons/controls will also need to be decided at a later date, as these designs are more to do with the layout of the controller than how it will accurately look. The final product will also contain a metal loop which can be used to clip it to a lanyard being worn by the falconer. This is so that the falconer does not have to hold on to the controller when they are dealing with a bird (very much a two-hand job).
Controller design 1:
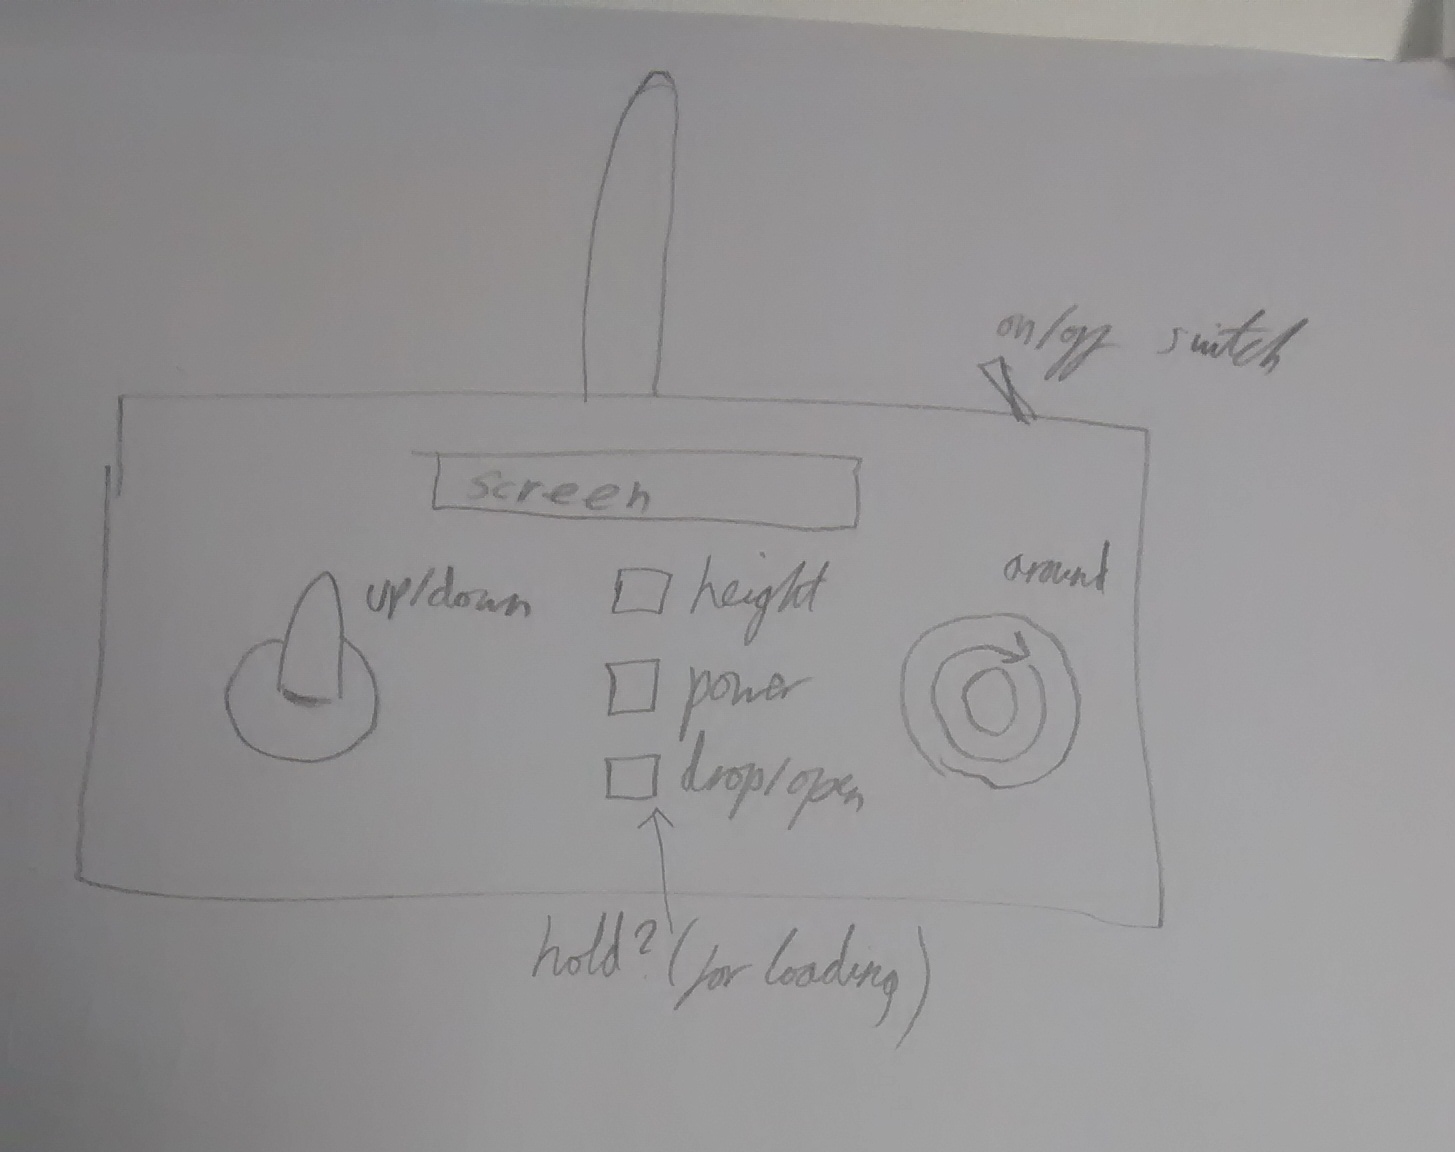
This follows the traditional design of UAV controllers. On the left would be a switch to control up/down movement in the UAV, and on the right would be a small joystick which allows for 360 degree rotation when selecting movements on a level plain. At the top/center would be the screen, showing various pieces of information to the user. Below this will be buttons to view heigh, power, and a button to control the dropping of the lure. This could be a toggle control or a hold control. There is an aerial at the top of the box, as well as an on/off switch. This design would hopefully be intuitive to use for the falconers, as it resembles the layout of the controller they purchased for use with their off-the-shelf UAV. It is big enough to fit in to two hands well.
Controller design 2:
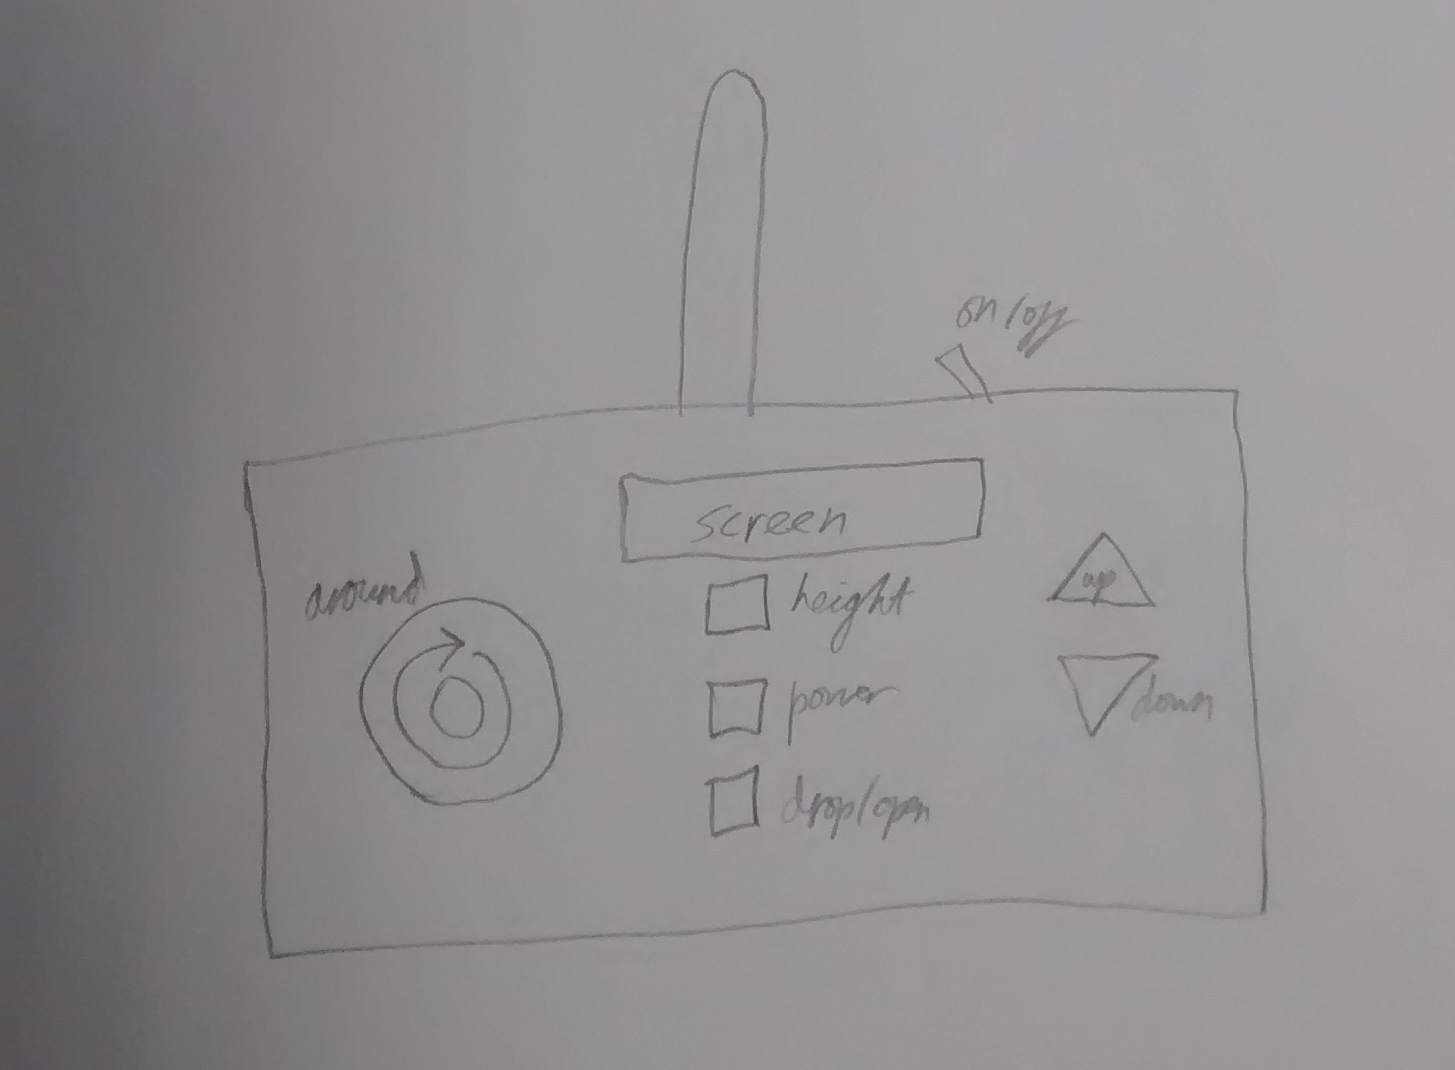
This design is similar to the one seen above, but has replaced the switch for up/down movement with two buttons. This simplifies the design slightly. It is desirable to have few protrusions in this design, as it will likely end up with some sort of waterproofing on top (which may be as basic as a sheet of clear plastic), which could inhibit the movement of switches.
Controller design 3:
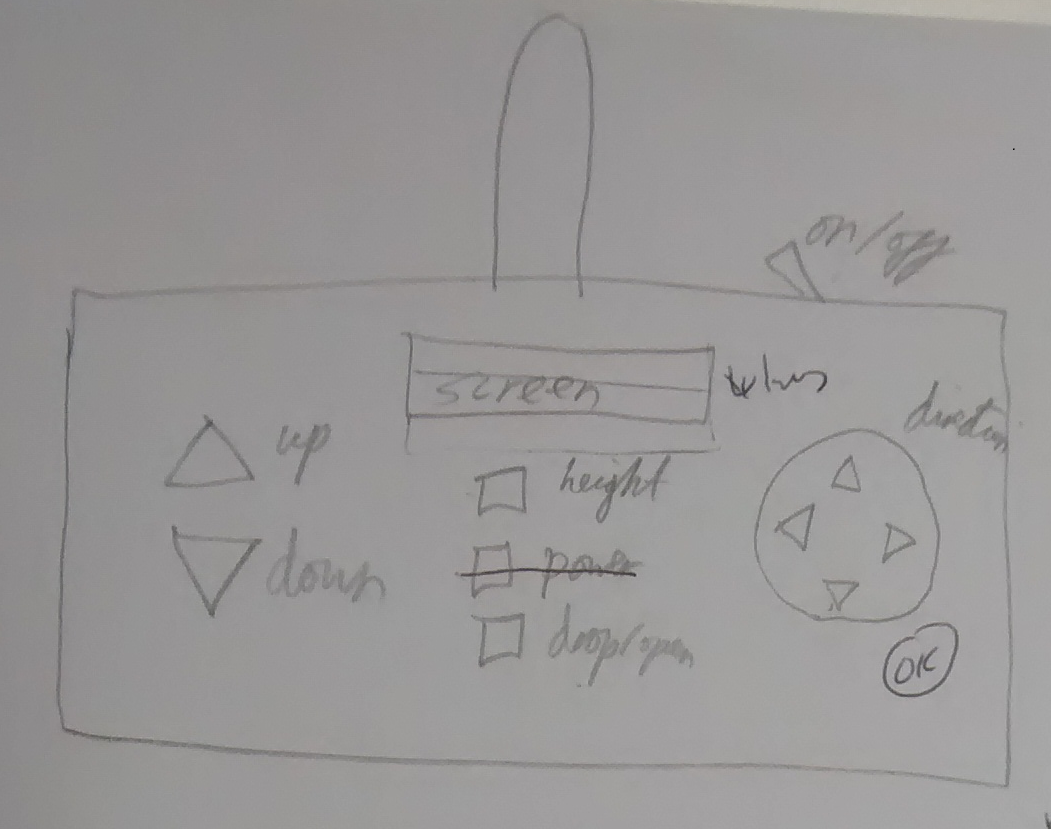
In this design, both of the joysticks have been done away with. This one is my favourite of the initial four that I drew, and so has scribbles on it from discussing the design with my dissertation supervisor. This design involves the use of up/down buttons for elevation, and a D-pad (directional pad) for the level movements of the UAV. My supervisor commented that it would be simple to integrate a four-line LCD instead of the single-line screen that I had been considering. Our initial idea is to build a menu system around this four-line screen. In previous designs I had assumed that the buttons in the center could be used to bring up what ever information is needed on the screen. With this four-line screen however, the D-pad could easily be used to navigate through a menu system, making these central buttons redundant. My supervisor suggested that having an OK button would also be useful, which has been drawn on above.
Controller design 4:
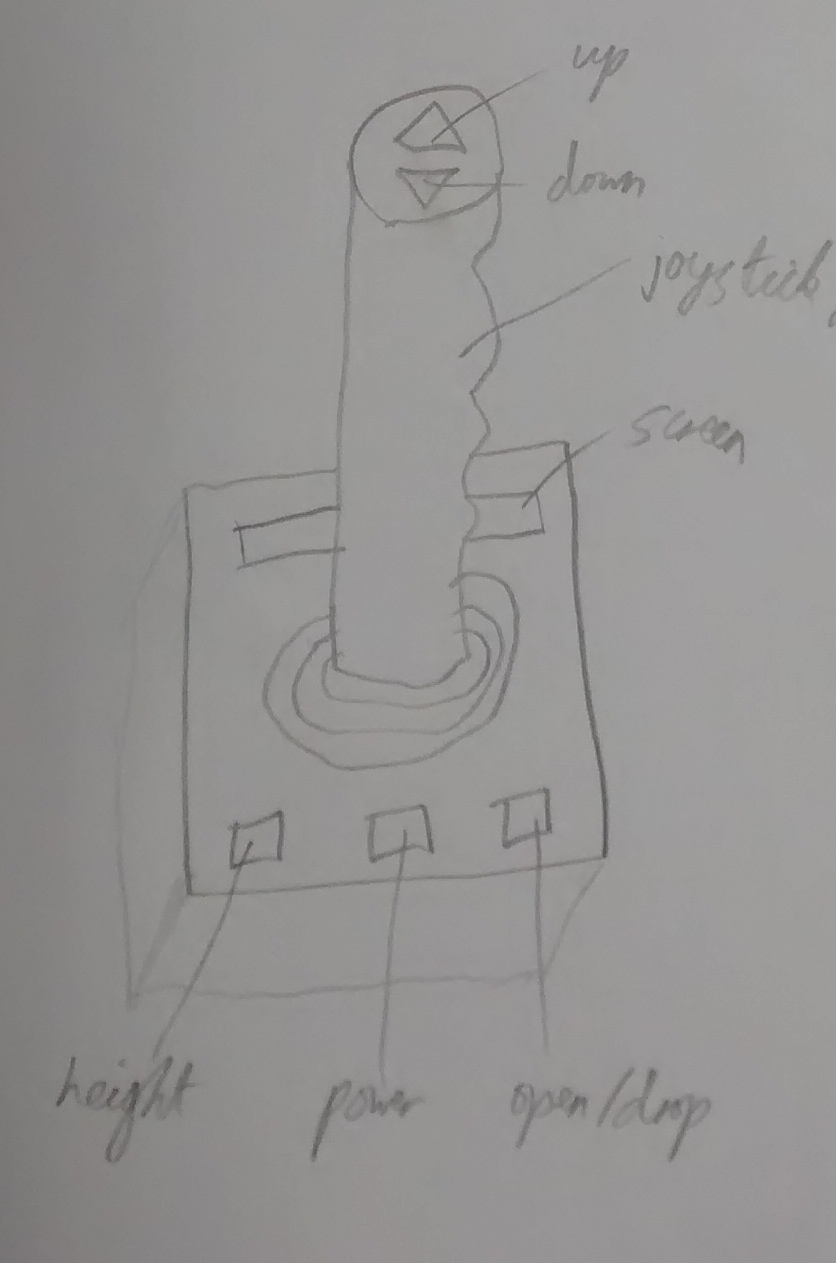
This design is based around the joystick design seen within aircraft. Up and down buttons have been added to the top of the joystick. There is still a screen at the top, with the previously seen buttons at the bottom. It was agreed that this design would be very difficult to create, as creating code to process input from a joystick is very finicky. This can also be said for the smaller joysticks seen on other designs. It would also be quite difficult to ruggedize, and would most likely not be able to hang from a lanyard in comfortable manner.
Controller design 5:
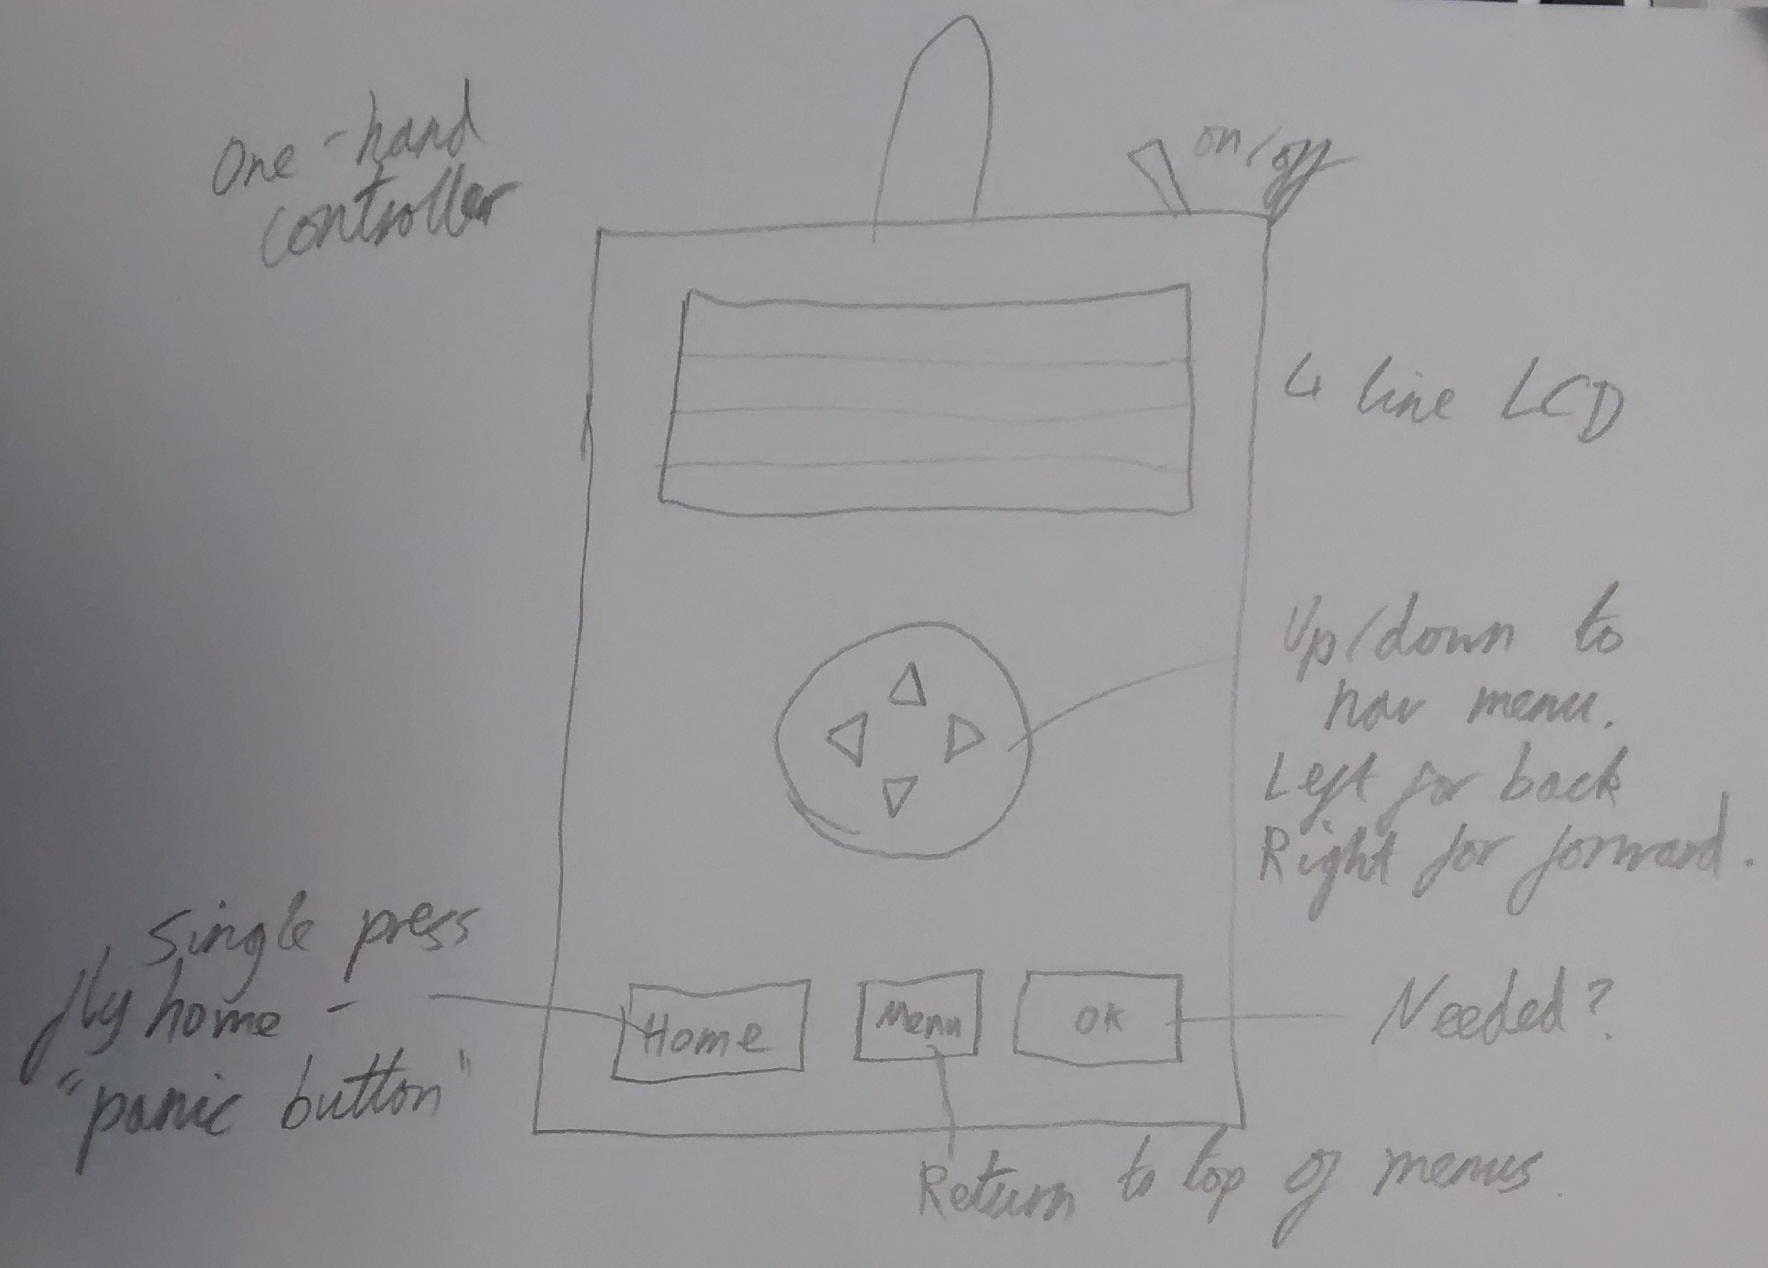
This design is a more refined version of the Controller design 3 sketch, taking in to account issues highlighted during the discussion with my supervisor. This design incorporates the four-line screen at the top, with a central D-pad below, followed by a different set of buttons to those seen previously. This design could be used with one hand or two as desired, and could be about the size of a mobile phone. As previously stated, the four-line screen will contain a menu. The screens that my supervisor and I are looking at fit 4×20 characters, which should be sufficient for this. The top like of the screen could always contain the title of the menu page the user is on, and the bottom line could contain metrics on the UAV (such as its power level and altitude). The middle two lines would show menu options. If there are more options than fit on the screen, the up/down arrows of the D-pad could be used to scroll through them. A small arrow could be used on the screen to indicate which line is currently “highlighted” for selection. This type of screen we wish to use is designed for use with Arduinos, and allows for custom characters to be created (as may be needed for an arrow). The use of a serial driver module may also be required (if it is not integrated with the chosen screen), to make the process of sending characters to the screen for displaying easier. It converts characters in to their ASCII values for you, so that you do not have to do the conversion yourself in your code. This will be useful for reducing the overall complexity of my project. The right and left arrows on the D-pad could be used to go backwards and forwards within the menu system.
The three buttons at the bottom are Home, Menu, and OK. The Home button could act as a “panic button”. If the UAV seems that it may be in trouble/doing something worrying, you would press this button to make the UAV return to its launch point. ArduPilot has the functionality to save the GPS location of the UAV when it is powered up, and save this as a waypoint to return to which issues arise, such as the UAV loses conntection to the controller. This waypoint could be attached to this button. I feel that this feature warrants a button rather than being something that can just be navigated to via the menu (it could still be useful to add it as an option in the menu system) as you may want to have as little time lag as possible between working out that there is an issue, and the UAV reacting. The Menu button would return the user to the top of the menu tree, so that they do not have to spend time repeatedly pressing the left D-pad button to step backwards through the menu tree. The OK button could be used when the right D-pad button is not an acceptable way to move forwards. For example, if the user navigates to the flight control mode and presses the right D-pad button to enter it, the D-pad will then become the flight controls. Pressing left would make the UAV move left, rather than exit out of the flight controls mode. The OK button could be used in this situation to escape this mode. Other uses may arise for it. If a hold button design is implemented for dropping the lure, perhaps the OK button could be used for this (as a standalone button it should be more comfortable to hold down that the D-pad button).
The D-pad based flight control system raises some questions about how the navigation of the UAV will work. For instance, will it could be in relation to where the user is standing. Forward and backward would be towards/away from the user, and if the user held the left button down continuously, the UAV would complete a circle around the user. However, the UAV would then need to have accurate details on where the user is at all times, which may not be viable. The “center” of the control system could be the point at which the UAV is turned on/launched from (the location associated with the Home button), but this would cause issues if the user moved away from this spot when controlling the UAV. In the demonstration I observed at the falconry school, the falconers tended to stand around the launch site during the flight, flying the UAV back to their hand before leaving it on the ground to go and retrieve the bird from the field they had been flying over. This control system may be difficult to implement however. I will need to do more research in to this area, including investigating which control systems ArduPilot may already allow for.
A more simple control method would be for the UAV to not change its controls in relation to anything. Forward is forward of the UAV, left is left of the UAV, etc. This method would be the simplest, but could be confusing to the user as they would have to remember the orientation of the UAV. However, as the UAV will not be doing any especially complex flying or be in any risky situations, the user accidentally flying the UAV in the wrong direction for a small amount of time may not be a huge issue. A hybrid of this method and the previously mentioned method could be used. The UAV would change its perception of its orientation based on what way it is facing in relation to the user. For instance, if the user is pointing forwards towards the user, and then does a 180 degree turn (so as to face away from the user), the side that is now facing the user could be considered forwards. I do not think that this would be a very intuitive method to use at first, as I don’t think the user would be expecting the UAV to use this method. It is possible that the user would find it easier to use once they became used to it, however.
Another control consideration is that of how the up/down altitude controls will work. It could be done via the user repeatedly pressing the button, or via holding it down. Holding down the button would probably be more comfortable for the user. Extermely precise control of height will not be needed, and so height could be considered in increments of 10 or even 5. If the user is holding down the up botton, data could be read from it every 0.5 seconds (for instance), incrementing the height by 10 meters each time. Some trials may need to be run to assess how long it takes for the UAV to move up/down, and how this matches up with the time which which the button is held down. For instance, if the button would need to be held down for 10 seconds to reach the target height but the UAV actually takes 20 seconds to reach that height, there would be the risk of overshooting by an annoying amount. Perhaps the screen could instead of just listing the height of the UAV in up/down flight control mode, it could also display the “target” height, which is the one that the current button presses would lead to. This would only be needed if actions were queued by the system however. It the aforementioned method of reading every 0.5 seconds, the user would need to hold the button down for as long as it took to reach the target point. This could be for quite a while, depending on the flight speed of the UAV. Running trials would give a better idea of which control method may function the best.
Controller menu flow diagram
Before coding the menu system, it is important to consider what options will be needed, and how they will be displayed. The diagram below shows what options could be used. The center shows the main overview menu, with the submenus of different options drawn around it.
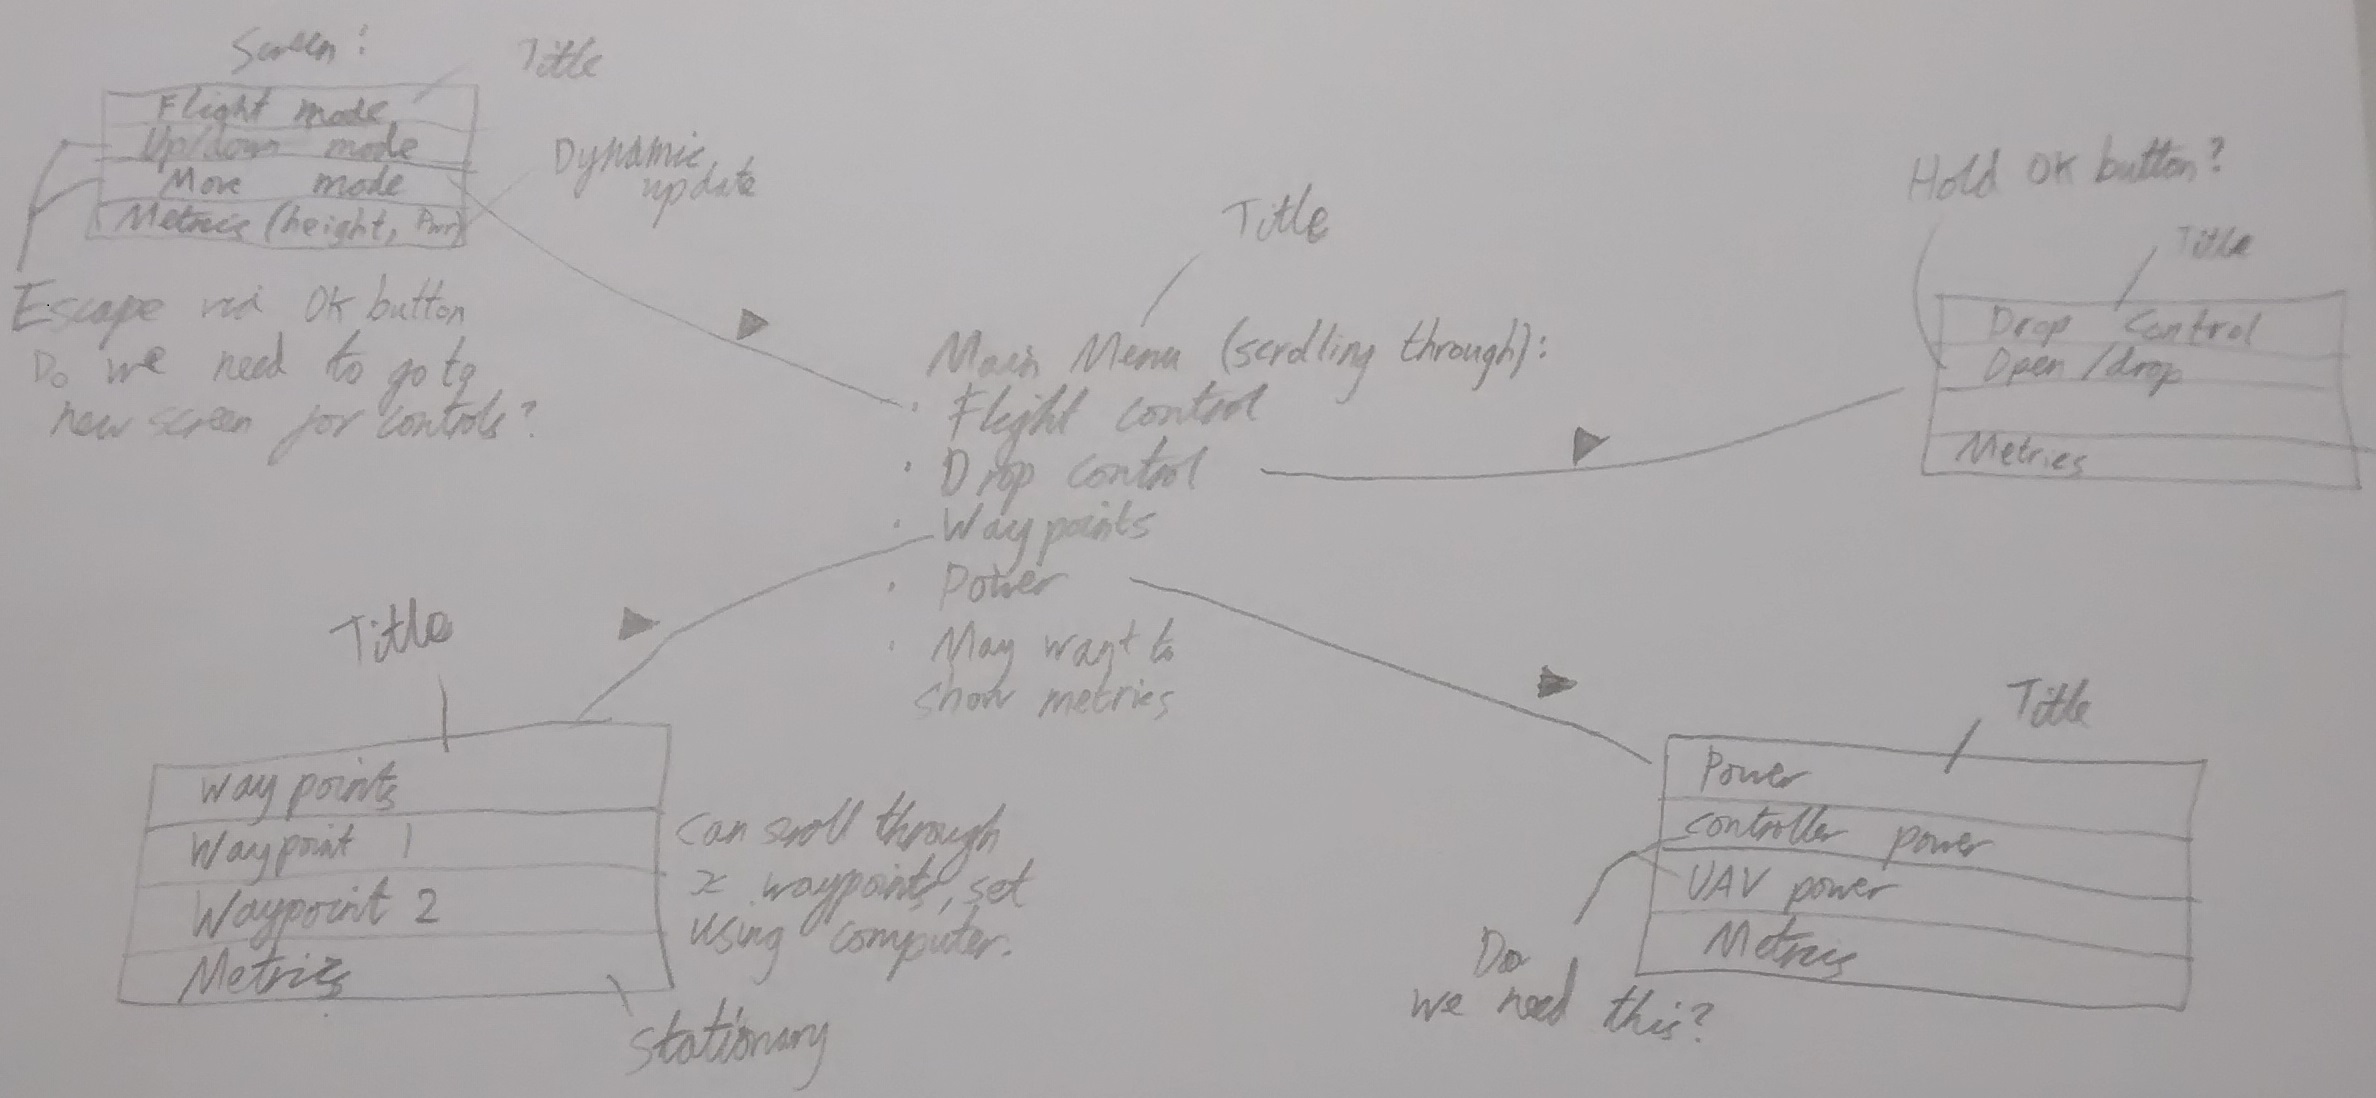 As previously stated, a four-line screen will be used. The top line of this would contain the title of that menu page, and the bottom would include metrics on the device. The options on the menu could be scrolled through/highlighted using the up/down buttons on the D-pad, with an arrow indicating the currently highlighted option.
The top left of the diagram describes the flight mode screen. This will need to have the option to indicate if you are wanting to move the UAV up or down, or move around on the level. It is possible that these two central options (as seen on the diagram) could lead to different screens which describe the controls. However, it is possible that the screen could remain showing the drawn screen even when flying. Perhaps a star could be used to indicate that a control mode is active, rather than it just being a highlighted option in the menu. So long as all of the metrics needed for flight (e.g. height and power) can be seen on this screen, there may well not be a need for the additional ones.
The top right screen shows how the drop lure menu could be used. This is very simple, as with the current design it will just cause an actuator to complete a half turn to drop the lure off of its hook.
The bottom left will be the waypoints menu. These will be locations that can be added by the user using a computer, for the UAV to return to at the press of a single button. The first one could be the waypoint created as the launch site of the UAV (which will be used by the Home button), and the others could be common locations. Depending on the time of year, there are a few fields used for falconry at the school. They tend to fly the UAV over a similar point each time, as they know there is a clear landing site underneath for the bird/UAV. These could be added as waypoints, so that the UAV will fly to them at the press of a button. This will allow for the user to concentrate on the bird, rather than on having to fly the UAV to the correct position. It will also hopefully help the less technically adept members of staff to use the UAV for falconry, as they could in theory do the entire flight via waypoints without having to manually control the UAV.
The bottom right screen is a detailed metrics screen. It could show details of the power for both the UAV and the controller, as well as the location/altitude of the UAV. It is possible that this screen may not even be needed however, if the metrics shown at the bottom of each menu screen are sufficient.
Be First to Comment